Required:
-
TNG must be installed.
On install you can select any PABX, if Aastra is not available. -
TNG/TCPProxy server IP must be static.
This is the IP you configure on the PABX side to send data to. -
Aastra 470 plugin to translate call details.
Download and unrar, password is ‘datatex’:
PAastra_A470_Format_PC5.rar (155.1 KB)
Save the dll in the folder: C:\Program Files\Datatex\tng\plugins -
proxy utility to receive call details from Aastra 470 PABX.
Download and unrar, password is ‘datatex’:
TCPProxy.rar (271.5 KB)
NOTE: PC TCPProxy is installed on must have a static IP (PABX sends data to that IP)
Install steps:
Install TCPProxy:
-
Extract the TCPProxy.rar file to the TNG folder.
Then make sure the INI file looks like this:
[INCOMING]PORT=2080 [OUTGOING]PORT=2081 OUTPUTFILE=C:\Program Files\Datatex\tng\tcpproxy.txtwhere C:\Program Files\Datatex\tng\ is the path to your TNG installation.
Please note that these settings are not written out to the INI file by default. -
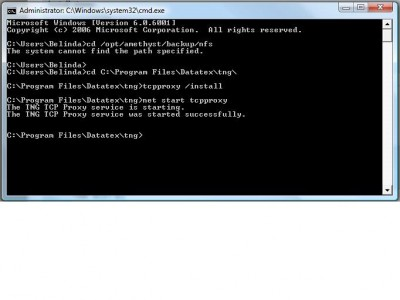
Open a command prompt, then run the following commands:
cd C:\Program Files\Datatex\tng\tcpproxy /installnet start tcpproxyThis will install the proxy into the Windows services, and start it. After this, it will start automatically when Windows starts, so you don’t need to execute those commands again.
Configure Aastra:
-
You must configure the PABX to send to port 2080 on the TNG PC.
Configure TNG to receive call details:
-
Configure TNG to connect to the service on port 2081.
Connect to TNG, login as the ADMIN user and go to the settings.
Select “NETWORK” in the Communication Mode.
Enter the PABX IP: 127.0.0.1
Enter the PABX port: 2081
Click Apply to save the connection. -
Configure TNG to read the tcpproxy.txt file.
Refer to forum post: [How do I configure TNG to load data from a file location?]
Ensure that the Aastra plugin you saved is selected
If TNG File input is used, set the path ‘C:\program files\datatex\tng\tngproxy.txt’ for the above configuration.
Trouble shooting:
-
Allow the ‘TCPProxy’ APP in the Firewall (if the firewall is active).
-
If the PABX is sending off call details to port 2080 and TCPProxy receives it, it will be written to the ‘tcpproxy.txt’ file in the ‘tng’ folder. If not written here, then TNG will not display anything on the Call List page. Please make test calls and ensure that call details is written to this file. If not, test if you PABX is sending out call details to the IP and port you configured.
NOTE: TNG will display the data in the tcpproxy.txt file. If any information missing in this file, you need to check why your PABX is not sending it.
Please make sure that the all available networks are allowed on the pc’s Firewall
Example : Domain, Private, Public
We have seen that the TNG and TcpProxy sometimes get stuck trying to access the same file. We have found a work around for this issue.
Here is the batch file to rename the tcpproxy.txt file to RAW_yyyy_mm_dd_hh_mm_ss.txt. Place this file in the same folder as the tcpproxy.txt and rename it from “renamefile.txt” to “renamefile.bat”.
renamefile.txt (1.0 KB)
Every time you run the batch file it will try and rename the tcpproxy.txt using the current time in the format as above.
You can then configure TNG to read in “RAW*.txt” files in place of the tcpproxy.txt file. Make this change and then restart TNG. If TNG is already stuck, we have found that you have to kill it with task manager and then start it again.
You can add the Batch file in the Windows task Scheduler and make sure that you tick the option that says to run the task even if no one is logged in
Latest Linux Plugin
2013.02.27.3
paastra_a470_format_pc5.rar (400.9 KB)
Password for rar file is ‘datatex’.